Introduction
搭建了这样博客,都是模板,忍不住会想添加一些个人的东西,丰富一下我们的博客。今天就介绍一些如何添加一些私人订制的东西。
私人订制一览
- 页面点击小爱心
- 看板娘
- 个人菜单栏和相应页面
- 待续·······
页面点击小爱心
打开网址:1
http://7u2ss1.com1.z0.glb.clouddn.com/love.js
添加于2018.10.28
鉴于上面的网址挂了,在这里把网址里面的js代码放在下面:1
!function(e,t,a){function n(){c(".heart{width: 10px;height: 10px;position: fixed;background: #f00;transform: rotate(45deg);-webkit-transform: rotate(45deg);-moz-transform: rotate(45deg);}.heart:after,.heart:before{content: '';width: inherit;height: inherit;background: inherit;border-radius: 50%;-webkit-border-radius: 50%;-moz-border-radius: 50%;position: fixed;}.heart:after{top: -5px;}.heart:before{left: -5px;}"),o(),r()}function r(){for(var e=0;e<d.length;e++)d[e].alpha<=0?(t.body.removeChild(d[e].el),d.splice(e,1)):(d[e].y--,d[e].scale+=.004,d[e].alpha-=.013,d[e].el.style.cssText="left:"+d[e].x+"px;top:"+d[e].y+"px;opacity:"+d[e].alpha+";transform:scale("+d[e].scale+","+d[e].scale+") rotate(45deg);background:"+d[e].color+";z-index:99999");requestAnimationFrame(r)}function o(){var t="function"==typeof e.onclick&&e.onclick;e.onclick=function(e){t&&t(),i(e)}}function i(e){var a=t.createElement("div");a.className="heart",d.push({el:a,x:e.clientX-5,y:e.clientY-5,scale:1,alpha:1,color:s()}),t.body.appendChild(a)}function c(e){var a=t.createElement("style");a.type="text/css";try{a.appendChild(t.createTextNode(e))}catch(t){a.styleSheet.cssText=e}t.getElementsByTagName("head")[0].appendChild(a)}function s(){return"rgb("+~~(255*Math.random())+","+~~(255*Math.random())+","+~~(255*Math.random())+")"}var d=[];e.requestAnimationFrame=function(){return e.requestAnimationFrame||e.webkitRequestAnimationFrame||e.mozRequestAnimationFrame||e.oRequestAnimationFrame||e.msRequestAnimationFrame||function(e){setTimeout(e,1e3/60)}}(),n()}(window,document);
将里面的代码复制下来,在/yoursite/themes/next/source/js/src文件夹里面新建一个love.js,将刚刚复制的代码保存进去。
然后打开/yoursite/themes/next/layout/_layout.swig,在末尾添加以下代码:1
2<!-- 页面点击小红心 -->
<script type="text/javascript" src="/js/src/love.js"></script>
如果添加在前面会出现找不到的bug。
看板娘
看板娘——也就是左下角的那个小姐姐啦。
Windows用户在Hexo根目录下面打开Git Bash,然后输入:1
npm install --save hexo-helper-live2d
然后在站点的配置文件中,也就是和source同级目录的_config.yml里面添加上:1
2
3
4
5
6
7
8
9
10
11
12
13
14
15
16
17
18
19
20
21
22
23
24
25# 宠物
live2d:
enable: true #是否允许出现
scriptFrom: local
pluginRootPath: live2dw/
pluginJsPath: lib/
pluginModelPath: assets/
model:
use: live2d-widget-model-shizuku #模型名称
scale: 1
hHeadPos: 0.5
vHeadPos: 0.618
display:
superSample: 2
width: 150
height: 300
position: left # 左侧还是右侧
hOffset: 0
vOffset: -20 # 离底部距离
mobile:
show: false # 手机客户端是否可见,推荐不可见,不然会影响阅读
scale: 0.5
react:
opacityDefault: 0.7
opacityOnHover: 0.2
更多模型名称点这里。
使用方法是,npm install 模型名称,然后将上述配置中的模型名称改为你安装的模型名称。最后clean,g -d,就可以看见啦~
最后上官网。
个人菜单栏和相应页面
个人菜单栏可以参见我的Machine菜单。可以看见这个菜单点进去,里面的页面样式和内容,和主题毫无关系。
更改配置文件
首先更改配置文件,让页面上能显示菜单名称和图标。
打开主题配置文件,也就是/yoursite/themes/next/_config.yml。找到menu。以我的为例:1
2
3
4
5
6
7menu:
home: / || home
categories: /categories/ || th
archives: /archives/ || archive
tags: /tags/ || tags
about: /about/ || user
samaritan: /samaritan/ ||
前面几项都是常规的,最后一个是我自己添加的。||前面是名称,后面是图标,更多图标名称见这里。
||后面只需要填写icon-name后面跟的name即可,不需要加上前面的”icon-“
在language中添加翻译字段
在/yoursite/themes/next/languages下面有zh-CN或者zh-hans,在这个文件里面的menu下添加上刚刚写的英文菜单名称对应的中文,还是以我的为例:1
2
3
4
5
6
7
8
9
10
11menu:
home: 首页
archives: 归档
categories: 分类
tags: 标签
about: 关于
search: 搜索
schedule: 日程表
sitemap: 站点地图
commonweal: 公益 404
samaritan: Machine
刚刚在配置文件中添加了一个samaritan,在这里我将这个samaritan添加了一个翻译变成了Machine(好吧,写这个的时候我才发现,我好像不用加翻译=。=,直接在配置文件中写Machine)。
在Source中添加页面内容
添加了上面两个,重新生成之后,你就会发现页面上已经有新添加的菜单栏了,但是点进去啥都没有。于是就要添加菜单相应的内容。
我选用的是疑犯追踪里面Samaritan的一个模仿界面。源文件在这里。
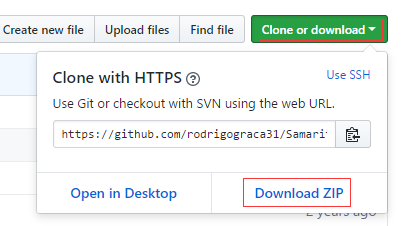
点击Clone or download:

然后下载ZIP。解压之后把文件夹名保存成samaritan。
这里的文件夹名称要和主题配置文件中的menu名称一致。
然后把这个文件夹复制到/yoursite/source/文件夹下面。
取消样式生成
最关键的一步来了,最开始我是直接放到public文件夹下,因为放到source里面的文件都会被强行加上next主题样式。那怎样让放到source里的文件在生成的时候不会强行加上样式呢?
打开站点配置文件,可以找到一个配置项skip_render:,这个配置项的意思是跳过后面的文件,不强行生成样式。以我上面的为例,如下填:1
skip_render: [samaritan/*] # 多个文件夹以逗号隔开
上面的意思就是samaritan里面的所有文件都不经过样式编辑,直接复制到pubulic文件夹内。其余的同理。
要点:主题配置文件中添加的menu名称和放入source里面文件夹名称一定要一致才能对应上。
底部标签前的井号更改为爱心
修改/yoursite/themes/next/layout/_macro/post.swig这个文件,在里面搜索rel="tag">#,更改为<i class="fa fa-tag"></i>
TODO
- 头像改为圆形
- 添加社交信息
- 右侧栏风格更改
- 尝试更改整体风格
后记
其实可以添加更改的还有很多很多,想尝试的还有很多。后续有空再改吧~~~